Introduction
Creating a .intunewin file and choosing the source file, source folder and the output folder is time consuming. Let´s also not forget the time we waste on searching for the newest version of a application we want to deploy. Following all this time consuming, manual steps I have created a tool that will automate all this steps with the help of Microsoft WinGet.
Here is a video that shows how it works:
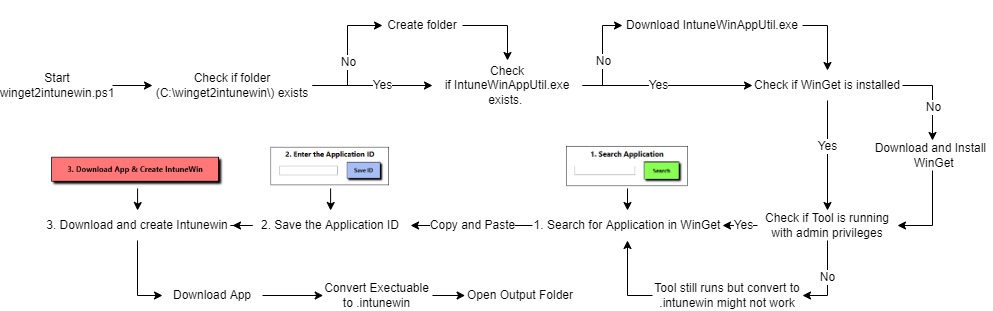
This is a Overview of all steps in the PowerShell Script:
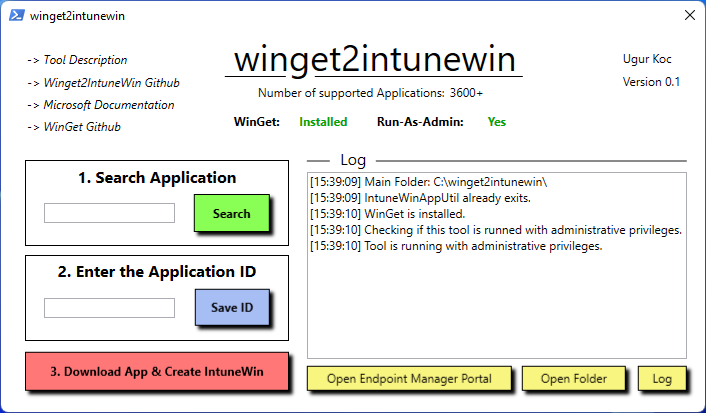
Features of the Tool
- Download the current IntuneWinAppUtil.exe.
- Download and install WinGet.
- Download the current version of Applications directly from the source.
- Extract the direct download link for any of the 3600+ applications from the WinGet Repository.
- Convert downloaded executables to a, ready to deploy, .intunewin file.
- Logging in a separate .txt file.
- Automate all of the processes above, with just providing the App ID from WinGet.
This is a early version (0.1). Expect new features and bug fixes in the near time.
Download winget2intunewin:

Goal of this post
Get a understanding of how WinGet works and also how we can use it for our needs to automate the creation of a .intunewin file.
Tools and Services used
- WinGet
- PowerShell (& WPF)
What is WinGet?
WinGet basically a tool from Microsoft that enables users to search for, install and also upgrade apps on their devices. It´s the client interface to the Windows Package Manager service. Don´t worry if you think that you will have to install it separately: Windows Package Manager WinGet command-line tool is bundled with Windows 11 and modern versions of Windows 10 by default as the App Installer. This is not always the case after testing it with various devices and OS Versions but the winget2intunewin-Tool will also check if it installed on your device and if not will try to install it. Check the docs from Microsoft to get a better understanding how it works and also look into the GitHub Repository:
Use the winget tool to install and manage applications
How to use it
It´s very easy to use this tool. Basically by providing a Application Name (1. Step: Search Application) the tool will search for the Application in WinGet and simultaneously create a App Folder under C:\winget2intunewin\$AppName. This is also the Output folder for the .intunewin file later on. Secondly the whole download process will start depending on the Application ID you paste from the first step (Check out the Video if you need) and after pressing the red button. Finally you will be presented with a .intunewin file which you then can upload to Intune and assign it to devices or users.
Prerequisites
- This tool relies on WinGet to find and also download applications, so even though winget2intunewin will try to install WinGet for you if it is not present, it could fail if this tool doesn´t run with administrative privileges which brings me to the second prerequisite:
- If possible, run this tool (.ps1) with administrative privileges. This will minimize errors e. g. installing WinGet or creating a .intunewin file with IntuneWinAppUtil from Microsoft. But again, test it on your own device and see for yourself whats fit you best.
Step-by-Step Guide
Search Application in WinGet

Type in the Application you want and click on Search.
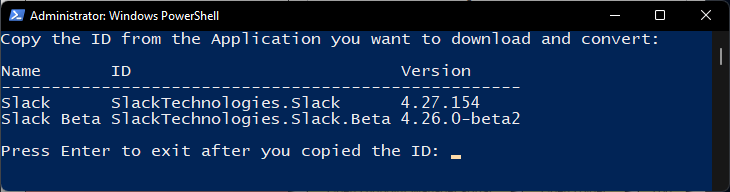
A new PowerShell Window will open up. Now you need to pick the ID (e.g. SlackTechnologies.Slack) of the Application you want to install. Copy the ID. We will need it in the next Step.
Info: Depending on what you type in the Application field, a new Folder named after the Application will be created in C:\winget2intunewin.
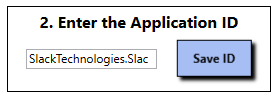
Copy and Paste the Application ID
Enter the ID from the first step into the second field and click on Save ID:
Be sure to check out the Logs on the right to verify that the ID was saved successfully:

Download the Application and create the IntuneWin file
After saving the Application ID, click on the last button to start the download and to create the IntuneWin file:

The download will start in a new PowerShell Window. The file will be saved in the Application Folder (e. g. C:\winget2intunewin\Slack).

After the download, the IntuneWinAppUtil will convert the file automatically to a .intunewin file which you then can go and upload to Intune.
Upload the App to Intune
Go to:
endpoint.microsoft.com -> Apps -> Windows
Click on +Add and choose Windows app (Win32) in the App type drop-down box.
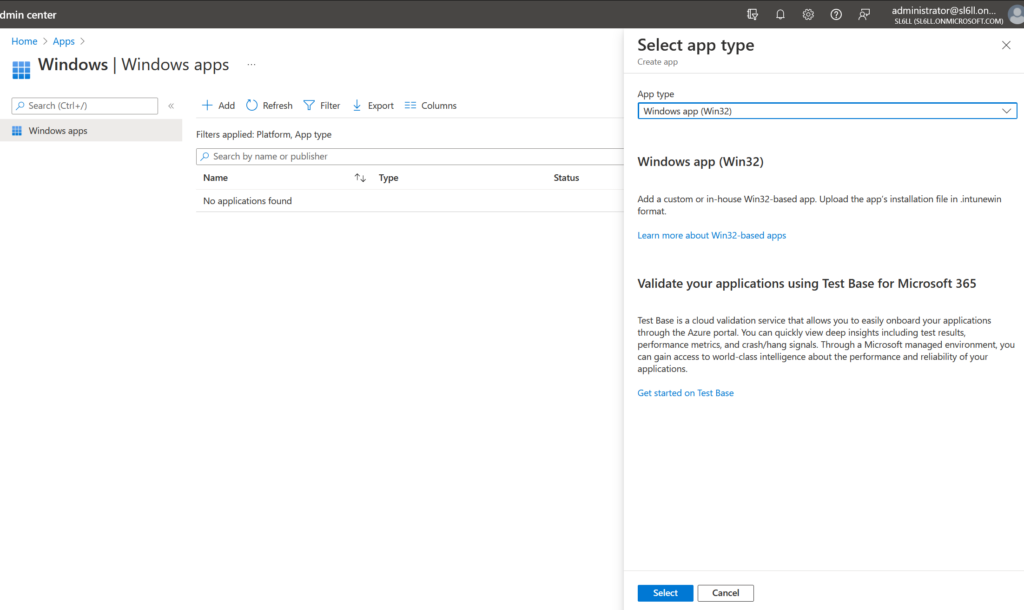
Click on Select.
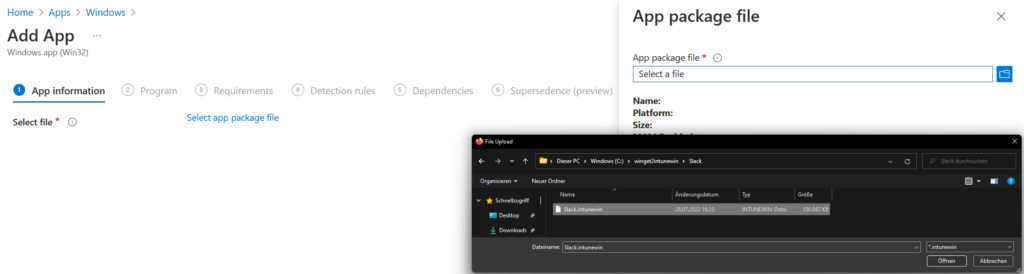
On the next page click on Select app package file and pick the .intunewin file in the output folder from the tool (e. g. C:\winget2intunewin\Slack)
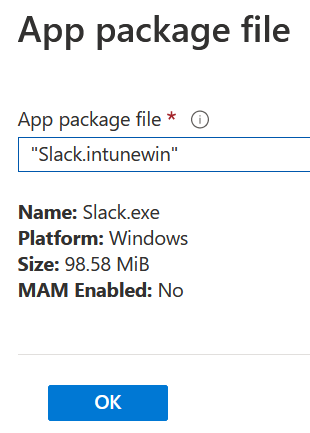
Click on OK, fill out the Publisher field and click on Next.
Proceed by filling out every other field and assign the app to a Azure AD Group.
Conclusion
I hope that this tool will help and save you some valuable time. Feel free to message me on Linkedin or Twitter to ask questions or to submit ideas and bugs.
You could add $ProgressPreference = “SilentlyContinue” for faster downloading 😉 (It’s really a lot faster)
Hi Harm,
thanks for the feedback. I did test it but I couldn´t get it to work in the new Powershell Process the GUI starts as soon as you click on Download. I hope to implement that when I have a Hashtable and Runspace ready for the next versions.
Best wishes,
Ugur
Ah, ok… But great project, nice work!
Thank you 🙂
I only get it working with slack app.
Greenshot – Search
Application id : Greenshot.Greenshot or 9N8Z6RQX8LV8 – Save ID
Download & Create -> I get empty folder
Hi,
I successfully tested it with Greenshot right now.
Can you please make sure that WinGet is installed? Open Powershell and type “winget –info”.
I did:
1. Type in the “Search Application” field Greenshot and clicked Search.
2. Copied the Application ID Greenshot.Greenshot and clicked on Save ID.
3. Clicked on Download App & Create IntuneWin.
You have to do it in this exact order to make it work. But first double-check if WinGet is installed.
Best Regards,
Ugur
Hello! I simply wish to give you a big thumbs up for the excellent info you have right here on this post. I will be coming back to your web site for more soon.
Can’t get this to work.
1. Search for ‘teams’
2. Copied id ‘XP8BT8DW290MPQ’
3. Click download app & create intunewin
4. Powershell output – “Exception calling “Substring” with “1” argument(s): “StartIndex cannot be less than zero.
Parameter name: startIndex”
Hi, the ID you are using is wrong. The ID for Teams is: Microsoft.Teams
You can double check the ID by opening Powershell and execution winget search Teams.
You will find the above mentioned ID in the Column “ID”.
Hi Ugur,
Seems like a very useful script.
However, I have the same issue:
1. Search for ‘Quick Assist’
2. Copied id ‘9P7BP5VNWKX5’
3. Click download app & create IntuneWin
Error
Exception calling “Substring” with “1” argument(s): “StartIndex cannot be less than zero.
Parameter name: startIndex”
At C:\Data\Scripts\Winget2IntuneWin\winget2intunewin.ps1:289 char:5
+ $download_app_extension = $download_url_trim.Substring($download_ …
+ ~~~~~~~~~~~~~~~~~~~~~~~~~~~~~~~~~~~~~~~~~~~~~~~~~~~~~~~~~~~~~~~~~
+ CategoryInfo : NotSpecified: (:) [], MethodInvocationException
+ FullyQualifiedErrorId : ArgumentOutOfRangeException
Get-ChildItem : Cannot find path ‘C:\winget2intunewin\QuickAssist\QuickAssist’ because it does not exist.
At C:\Data\Scripts\Winget2IntuneWin\winget2intunewin.ps1:308 char:38
+ … $download_size_progress = $((Get-ChildItem $setupfile_path).Length …
+ ~~~~~~~~~~~~~~~~~~~~~~~~~~~~~
+ CategoryInfo : ObjectNotFound: (C:\winget2intun…ist\QuickAssist:String) [Get-ChildItem], ItemNotFoundException
+ FullyQualifiedErrorId : PathNotFound,Microsoft.PowerShell.Commands.GetChildItemCommand
Get-ChildItem : Cannot find path ‘C:\winget2intunewin\QuickAssist\QuickAssist’ because it does not exist.
At C:\Data\Scripts\Winget2IntuneWin\winget2intunewin.ps1:314 char:35
+ … $download_size_final = $((Get-ChildItem $setupfile_path).Length …
+ ~~~~~~~~~~~~~~~~~~~~~~~~~~~~~
+ CategoryInfo : ObjectNotFound: (C:\winget2intun…ist\QuickAssist:String) [Get-ChildItem], ItemNotFoundException
+ FullyQualifiedErrorId : PathNotFound,Microsoft.PowerShell.Commands.GetChildItemCommand
Hi Gertjan,
I checked it why some people have wrong application IDs. The reason is, that there are two sources that winget uses when you search for a application. 1. MSStore 2. Winget itself. Double check to use the application id where the source column says “Winget”. Quick assist is a good example as the winget repository doesn´t seem to support it right now.
I am working on a new update so that it is easier to search for the supported IDs and also the MSStore.
Best Regards,
Ugur