Goal of this blog post:
Automate the process of assigning tags to devices for a better observability and filtering in the MDE Portal, help create device groups and also implement Role Based Access Control (RBAC) based on the device tags.
In this blog post we will use the following tools and services:
- Endpoint Manager (Intune)
- Defender for Endpoint (MDE) Portal
- Azure AD
- Proactive Remediation
- PowerShell
1. What are MDE Tags?
The Microsoft Defender for Endpoint (MDE) Portal gives us a option to filter and group devices based on the tags we assign to devices. This is a simple way to create device groups based on the tags we define and also to filter out devices we don’t want to consider and therefore create a cleaner overview of critical information’s regarding the devices and security incidents. In summary it can be said that mainly larger enterprises will profit from it where we can expect multiple locations and a large amount of devices.
2. Why should you consider using device tags in the MDE Portal?
There are some advantages like:
- Device groups based on each device tag.
- Filtering for specific device Groups and properties (e.g. Critical Infrastructure or VIP Assets)
- Isolate critical assets (e.g. Servers) from other assets and endpoints.
- Apply RBAC in MDE based on the device tags and groups you create.
- Users can only see devices in MDE with the specific tags.
- Better observability in the device Inventory and in the Threat and Vulnerability (TVM) Dashboard through filtering based on the device groups.
- Use it to filter out decommissioned assets that were not deleted from the portal but could play a important role sometime in the future when there is a incident that could fall back to any of this devices.
3. Setting the device tag
There are multiple ways to automate the process of setting a device tag. You could of course use the portal and assign them manually but this is boring and something we could easily automate.
Let´s begin:
Setting the tag via Intune:
There are two main ways we can go. Either by a Settings Profile or Proactive Remediation. Both ways work, while I prefer Proactive Remediation. This way we can deploy two scripts on our endpoints: First a detection script which will check if the device tag is already set and report a success or failure to Intune and second if the detection found no device tag, a remediation script will take over and set the tag. This also gives us the possibility to see outputs and status for each device.
3.1 OMA-URI Settings Profile
Go to endpoint.microsoft.com -> Devices -> Windows -> Configuration Profiles -> Create profile -> Choose “Windows 10 and later” and Templates -> Custom
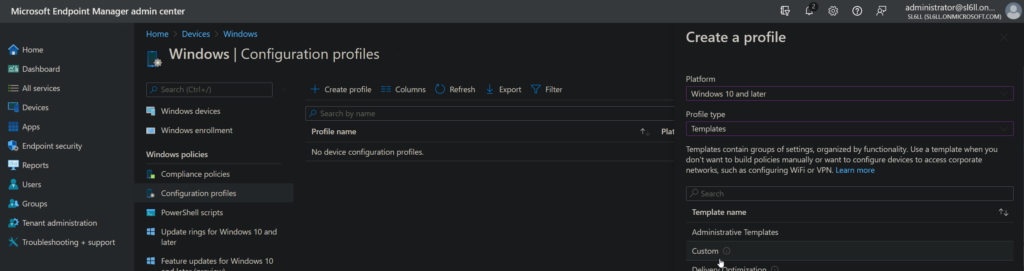
Click on create and a new windows will open.
Give the profile a Name like “MDE Device Tag – VIP” and click on Next.
On the next page, click on Add and fill it out like this (Choose the name as you like and maybe add a Description):
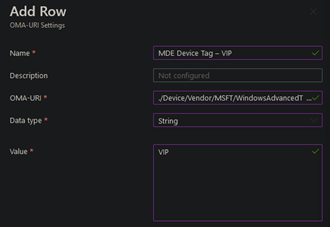
Paste the following in the OMA-URI field:
./Device/Vendor/MSFT/WindowsAdvancedThreatProtection/DeviceTagging/GroupChoose a device tag you want to set and type it in the “Value” field.
If you are ready, click on Save. It should look like this now:
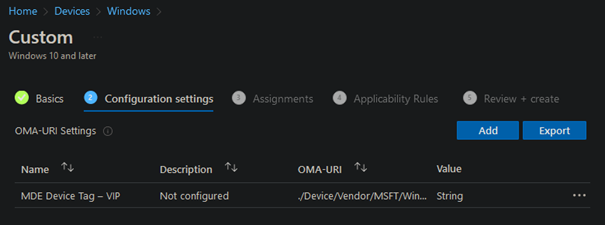
Click on Next and assign this profile to a Azure AD group with the devices you want to set a device tag for.
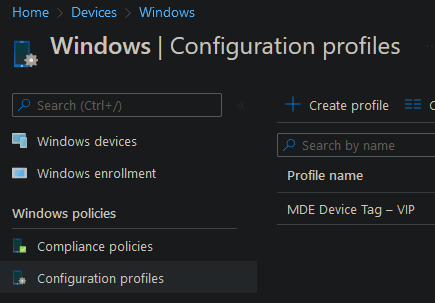
Click on create and this is how it should look like:
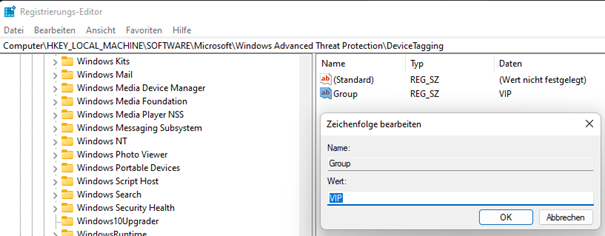
The next time the assigned devices will contact Intune and sync profiles, the device tag will also be set. You can verify it in the registry editor of the devices:
HKLM:\SOFTWARE\Policies\Microsoft\Windows Advanced Threat Protection\DeviceTaggingOn the device, the key will look like this:
3.2 Proactive Remediation
We will first create the detection and remediation script and package them both to deploy them on the devices.
Read this for a well written introduction to Proactive Remediation -> Link
3.2.1 Detection Script
Create a .ps1 file and paste the following into it:
# Define parameters
$Path = "HKLM:\SOFTWARE\Policies\Microsoft\Windows Advanced Threat Protection\DeviceTagging" # Dont change this.
$Tag = "VIP" # Fill in a device Tag you like. VIP is just an example.
$Name = "Group" # Dont change this.
$Value = (Get-ItemProperty $Path).Group

if ($Value -ne $Tag) {
    Write-Output = "Key does not exist in the registry of the device. Starting remediation script ..."
    exit 1 # Sends Exit code 1 (Error) to Intune and runs the remediation script.
} else {
    Write-Output = "Folder does exist and Registry Key is correct. Nothing has to be done."
    exit 0 # Sends a Exit code 0 (Success) to Intune. The remediation script doesn´t have to be run.
}
Save the script. My script is called Device_Tag_Detection.ps1.
3.2.2 Remediation Script
Create a .ps1 file and paste the following into it:
# Define parameters
$Path = "HKLM:\SOFTWARE\Policies\Microsoft\Windows Advanced Threat Protection\DeviceTagging" # Dont change this.
$Tag = "VIP" # Fill in a device Tag you like. VIP is just an example.
$Name = "Group" # Dont change this.

# Create folders
New-Item -Path $Path -Force

# Create and set the key value ($tag)
Set-ItemProperty -Path $Path -Name $Name -Value $Tag -Force

$Value = (Get-ItemProperty $Path).Group

if ($Value -ne $Tag) {
    Write-Output = "Error. Could not set the device tag."
    exit 1 # Sends Exit code 1 (Error) to Intune.
} else {
    Write-Output = "Success."
    exit 0 # Sends a Exit code 0 (Success) to Intune.
}
Save the file as something like Device_Tag_Remediation.ps1.
Link to GitHub were you can find both scripts: GitHub

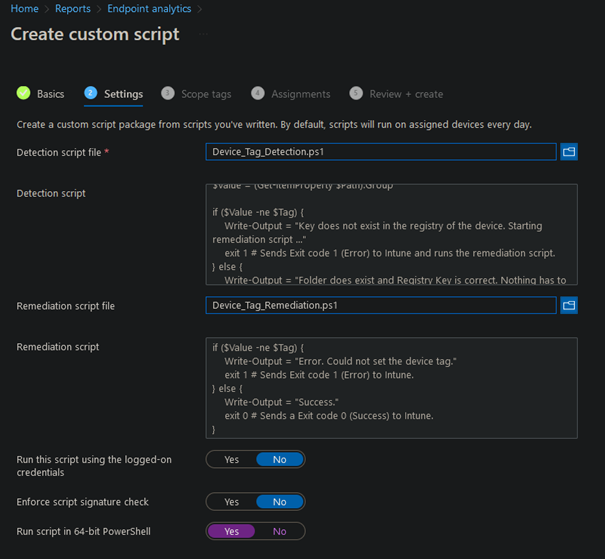
3.3 Create the Proactive Remediation – Script Package
Go to endpoint.microsoft.com -> Reports -> Endpoint analytics -> Proactive remediations
Click on Create script package and give the package a name.
On the next page, choose both of your .ps1 files we created before and upload them. Also set the “Run script in 64-bit PowerShell” option to “Yes”. It should look like this:
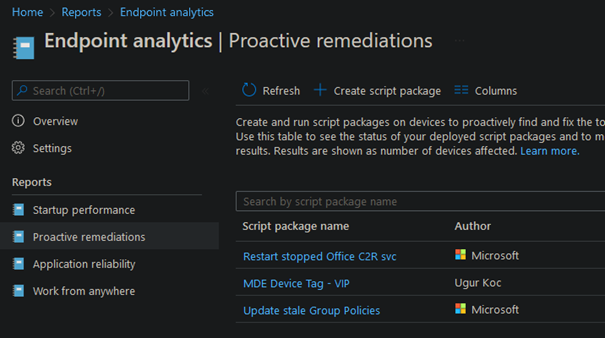
Click on next and assign this package to a Azure AD Group that has the devices as members.
Result in my demo environment:
4. Deleting the device tag
Normally you can delete a tag in the device inventory in the MDE portal. But if you set the device tag in the registry of a device, then you will have to delete it from there. This is because even if you delete the tag in the MDE portal, the device will report the same tag again to MDE every time it starts a Intune sync (or restart) because of the still existing registry key.
To delete the key in the registry you can use the following code and deploy the script to devices via Intune:
$Path = "HKLM:\SOFTWARE\Policies\Microsoft\Windows Advanced Threat Protection\DeviceTagging" # Dont change this.
$Tag = "" # Should be blank, if you want no device tag.
$Name = "Group" # Dont change this.

Set-ItemProperty -Path $Path -Name $Name -Value $Tag -Force
5. Creating device groups in the MDE portal
There are few things we need before we start:
- A Administrative Role in MDE.
- Azure AD Group with the members who will be able to manage the devices in our device group.
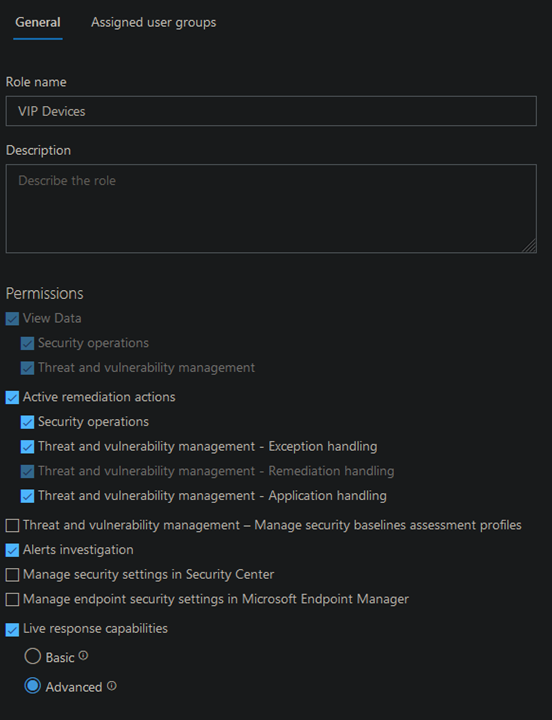
First we need to create an Administrator Role in the MDE Portal:
Go to security.microsoft.com -> Settings (Bottom left) -> Endpoints -> Roles -> Add Role
Define the role and permissions for this role. You will be able now to choose what the members of this role will be able to do like initiating a live Response Session.
Example:
Click on next and add a Azure AD Group to the role with members that will later on have the Permissions you configured for this role. I have created group called MDE_Role_VIP_Devices and will add it now to the role:

Click on Add Group and then on Save
After you saved the configuration, you will see the new role:

Don’t be confused by the first role at the top. This is by default. We focus on the latter.
Now after having a Role and a Azure AD Group, we can go further and create a device Group.
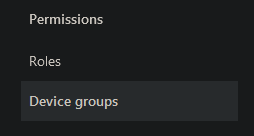
Go to the device group blade right under the roles tab we worked in above:
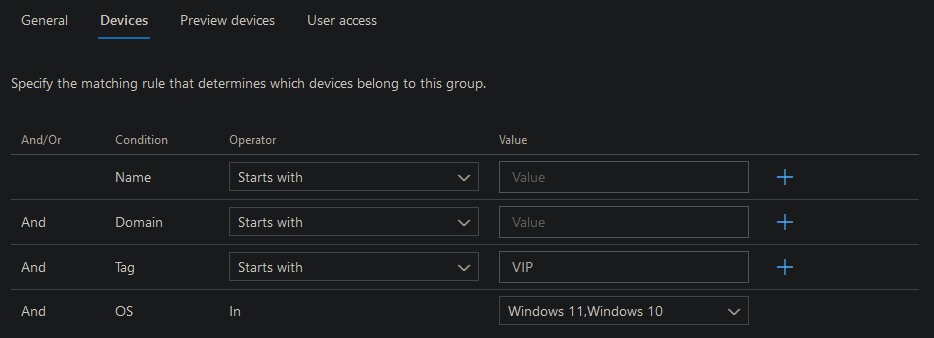
Click on add device group, give it a name and choose your automation option. Example:

Go to the next tab and configure on what properties devices will be added to this group. This will help us to automate this step and makes it less error prone:
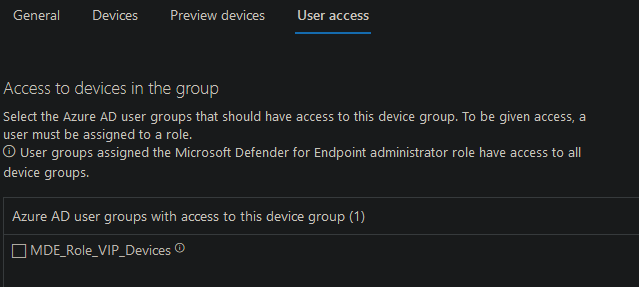
Finally add the Azure AD Group with the members from the first step above. I used the following:
Click on finish.
This is the result:

6. Filtering for device tags
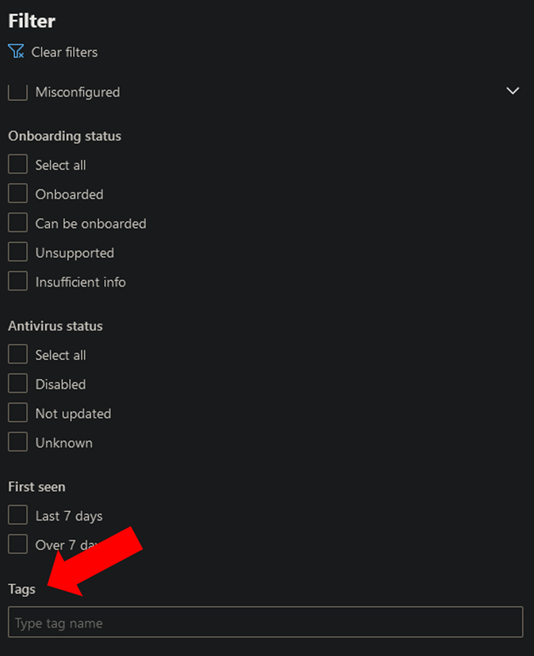
We can now filter for devices that we want to focus on and only show information’s for a subset of devices in our environment. TO achieve this, go to the device inventory in the MDE portal and click the “Filter” button on the right side. Scrolling down gives you the possibility to type in a device tag like “VIP” we used in this blog article.
This will result in only showing the devices that have the specific device Tag.
7. Conclusion
We have now created a device Tag, a device group and a administrative role in the MDE portal. I hope this blog post helped you in understanding the concepts and how to set the device tag in your environment. Thanks for reading.
8. More information
Microsoft: TechCommunity, Docs
You can also create a Azure Logic App to set device tags which utilizes the MDE API:
1 thought on “Automate the process of setting MDE device tags via Intune”
Comments are closed.