Update: There is a new Version available. It adds a way to Update Windows before starting the Autopilot process as well as exporting the Hash to a USB Device. -> PowerShell Gallery
At this point most of us that are working with the Microsoft Endpoint Manager have used or are currently using Autopilot. I think that we can all agree that Autopilot is very useful for the cases it runs without problems.
It is necessary to import the device hash to your Tenant to register the device. After successfully importing the hash the device will be able to use your pre-configured deployment profile. To make this process quick and efficient, I am using the Get-WindowsAutoPilotInfo script from Michael Niehaus. You can find it here: Powershell Gallery.
On top of that I figured, why not create a GUI with some additional features. Let me now introduce you to the Autopilot Import GUI.
But first: I take no responsibility to any damages or any other things that might happen to your devices. Please test it in a secure environment like a Virtual Machine before you deploy it to production.
After you have followed this guide steps, the script will start a GUI that will look like this:

As this is tool is based on PowerShell you would not be able to run it in WinPE (without additional Steps). It runs best in the OOBE Phase where you can e.g. choose the region of the device. Example with Windows 11:

Source Code
You can find the script on my Github and also at the PowerShell Gallery Website:
How does it work?
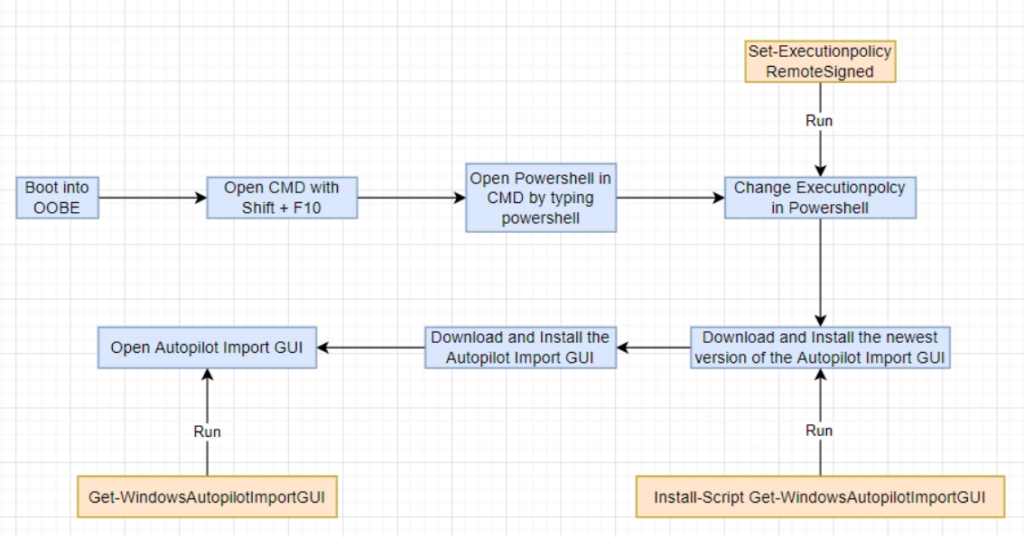
I tried to provide a overview (or workflow) in the following diagram that has all the important steps to get started. You will see that it´s really easy to import the device to Autopilot by typing in only a couple of commands in PowerShell. Everything else will be handled for you.

Step by Step:
- In OOBE: Start the Command Line by simultaneously pressing Shift + F10.
- Open Powershell by typing in Powershell.
- Run “Set-Executionpolicy RemoteSigned”
- Run “Install-Script Get-WindowsAutopilotImportGUI”
- Run “Get-WindowsAutopilotImportGUI”
Features
Tool description

- Check Internet connection.
- Open Guide (this blog post).
- Basic device information.
- Enter Group Tag (optional).
- Save Group Tag to display it in the output box (optional).
- Start the Autopilot import.
- Check the connectivity to Microsoft Services.
- Box to display the output.
Import Device with Group Tag
If you don´t use Group Tags already I highly recommend you to use them. It really makes sense in a Zero Touch scenario and will automate also the assignment of your deployment profile for the devices in AutoPilot.
Import Device without Group Tag
In cases where you don´t make use of Group Tags you can just ignore this option and start the import process by selecting “Login and register device in AutoPilot”.
Network Connectivity Check
Some of the problems you may encounter are based on failed connections to important Microsoft Services. With the Network Connectivity Check, you will be able to ping the following DNS Adresses and the releted services on Port 443:
Enterprise registration:
- enterpriseregistration.windows.net
- enterpriseenrollment-s.manage.microsoft.com
Windows Autopilot Deployment Services:
- ztd.dds.microsoft.com
- cs.dds.microsoft.com
- login.live.com
License activation service:
- activation.sls.microsoft.com
Windows Update for Business Service:
- update.microsoft.com
Single Sign-On:
- autologon.microsoftazuread-sso.com
TPM Connectivity to Intel, Qualcomm and AMD:
- ekop.intel.com
- ekcert.spserv.microsoft.com
- ftpm.amd.com
- azure.net
Config deployment and access for managed devices:
- login.microsoftonline.com
- config.office.com
- graph.windows.net
Network requirements for PowerShell scripts and Win32 apps:
- euprodimedatapri.azureedge.net
- euprodimedatasec.azureedge.net
- euprodimedatahotfix.azureedge.net
This is the best result you can get (all connections are successful):

Conclusion
I hope that this blog post was easy to follow. Feel free to message me on Linkedin or Twitter to ask questions or just leave a comment below.
2 thoughts on “Autopilot Import GUI”
Comments are closed.